Camera
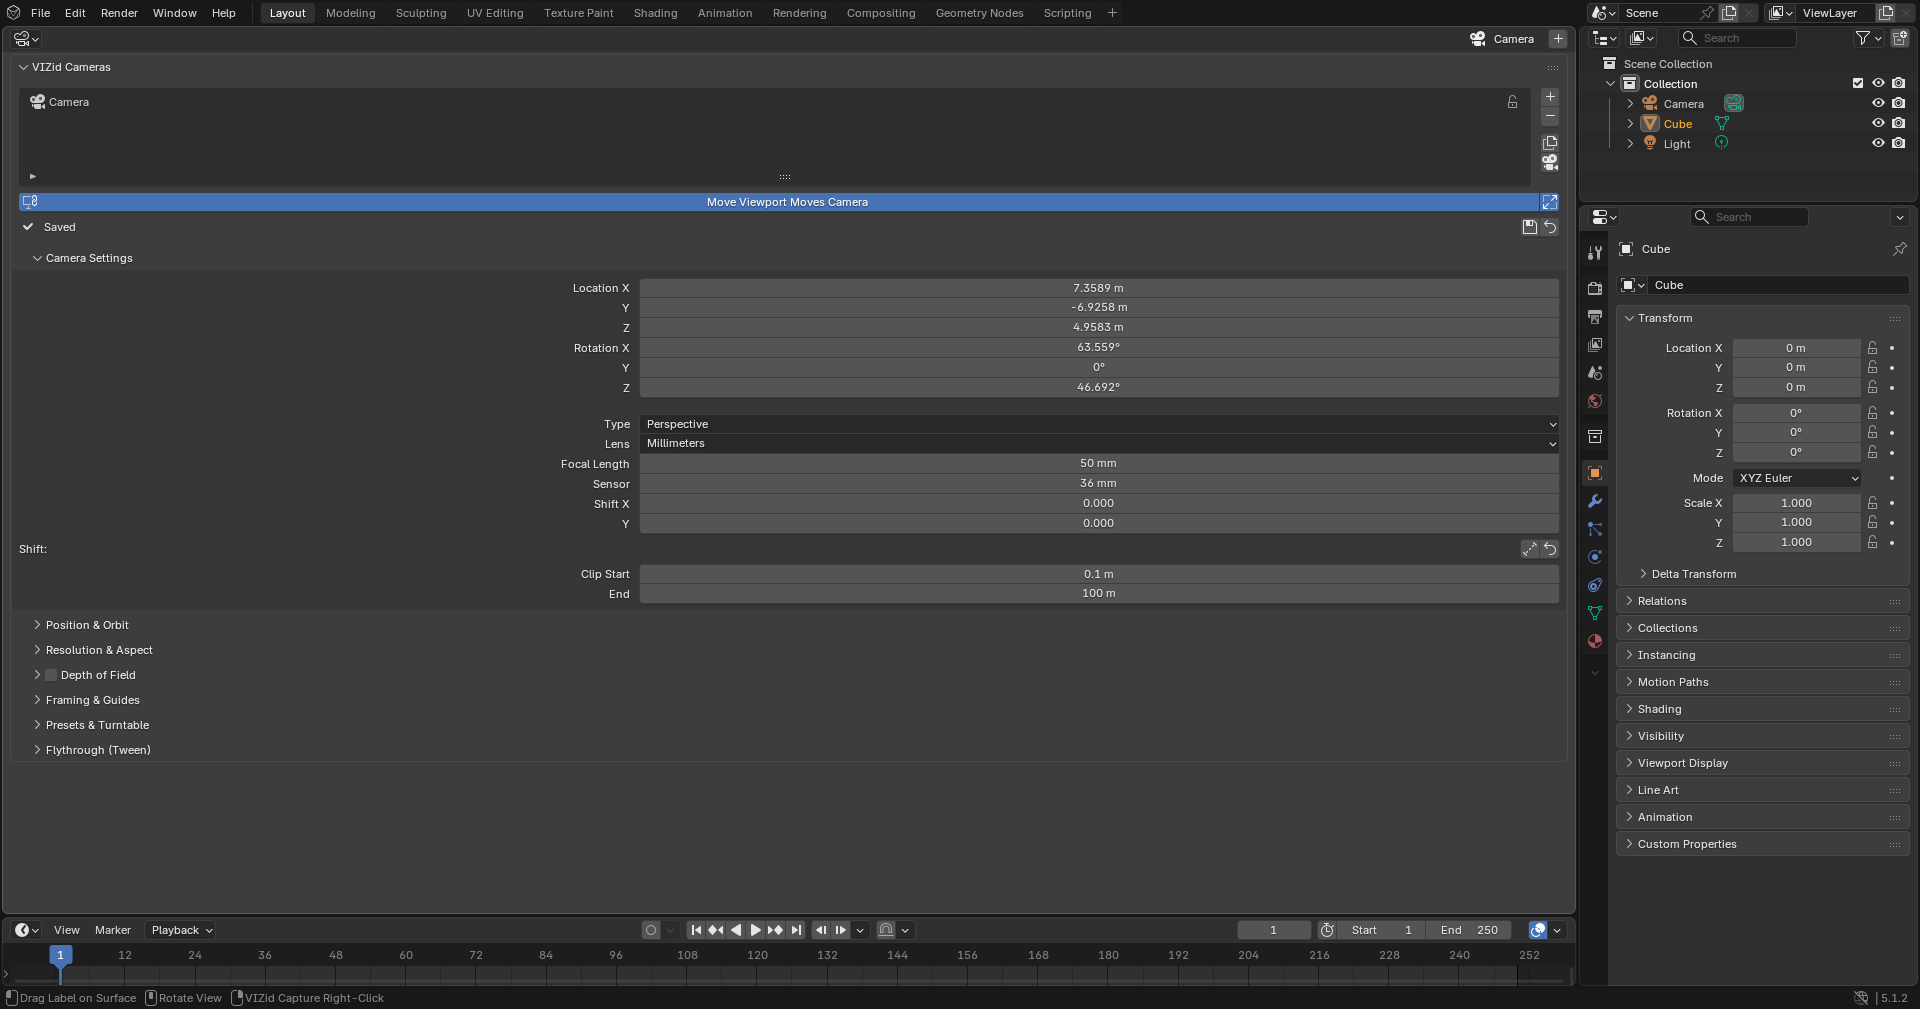
The VIZid Camera editor.
The Camera editor is the camera manager of VIZid Suite. It gathers Blender’s scattered camera controls into a single unified panel: a list of the scene’s cameras, a position-and-orbit rig that swings the active camera around a target, the full lens, depth-of-field and framing settings, and per-camera resolution – all in one place.
Selecting a camera in the list makes it the scene camera and looks through it in the open 3D Viewports. While Move Viewport Moves Camera is on, navigating a viewport flies the active camera with it, so the camera is composed by simply looking around the scene.
The Camera editor runs in the dedicated Camera editor. In stock Blender it falls back to a Camera tab in the 3D Viewport sidebar, so nothing is lost. The product-camera presets and the turntable, shared with the render manager, are surfaced here as well.
Reference
- Editor:
Camera
- Panel:
The Camera List
The VIZid Cameras panel lists every camera in the scene. Each row shows the camera icon (filled for the active camera), its name – editable inline – and a padlock.
Selecting a camera activates it: it becomes the scene camera and every open 3D Viewport looks through it. Switching cameras also fits the camera frame in the viewport when Auto-Fit Camera in View is enabled.
The column of buttons beside the list manages the cameras:
- Add (Add Camera)
Adds a new camera aligned to the current view and makes it active.
- Remove (Delete Camera)
Deletes the selected camera. A locked camera must be unlocked first.
- Duplicate (Duplicate Camera)
Copies the selected camera, with its own camera data, and selects the copy.
- Camera to View (Align to View)
Snaps the selected camera to the current viewport view.
Locking a Camera
The padlock at the end of each row locks or unlocks that camera. A locked camera has its location, rotation and scale frozen so it cannot be moved by accident, and it is excluded from Move Viewport Moves Camera. A locked camera also refuses Delete, Camera to View, framing and orbiting until it is unlocked, and the transform fields in the settings are greyed out. A note below the list reports when the selected camera is locked.
Move Viewport Moves Camera
The Move Viewport Moves Camera toggle is a direct navigation feel: with it on, orbiting, panning or zooming a 3D Viewport moves the active camera along with the view. It is on by default and mirrors the viewport’s own Lock Camera to View option, so the two always agree. A locked camera is never moved by this toggle.
The Auto-Fit Camera in View toggle beside it fits and centres the camera frame in the viewport whenever a different camera is selected.
Saving and Reverting
Each camera keeps a saved state – a snapshot of all the settings the Camera editor edits. A status line below the list shows whether the active camera is Saved, has Unsaved changes, or is Not saved, alongside two buttons:
- Save Camera
Stores the camera’s current settings as its saved state. Adjustments made afterwards stay unsaved until the camera is saved again.
- Revert Camera
Discards unsaved changes, restoring the camera to its last saved state.
A camera can be adjusted freely while it is selected without losing the saved state. Switching away to another camera and back reverts any unsaved changes automatically, so only an explicit Save Camera persists an edit. A newly added camera, and every camera in a freshly opened file, starts from a clean saved baseline.
Camera Settings
The Camera Settings sub-panel holds the camera’s transform and lens. The Location and Rotation fields position the camera directly; they are greyed out while the camera is locked.
Type switches between Perspective and Orthographic. For an orthographic camera, Size sets the viewing extent. For a perspective camera, the Lens unit toggle chooses how the lens is specified:
Field of View enters the angle directly in degrees.
Focal Length enters the lens in millimetres, with the Sensor width alongside it.
Shift X and Y offset the lens without tilting the camera – the way to keep verticals upright in product shots. Below the shift fields, two buttons act on the perspective lens shift:
- Two-Point Perspective
Levels the camera and solves the vertical lens shift numerically so verticals stay vertical while the target remains centred (see Two-Point Perspective).
- Reset Shift
Returns both lens-shift values to zero.
Clip Start and End set the near and far clipping distances.
Position & Orbit
Position and orbit about a target.
The Position & Orbit sub-panel is the turntable-style orbit rig. The camera swings around a target – its centre of rotation – described by three values:
- Distance
How far the camera sits from the target. Changing it dollies the camera in or out along its line of sight.
- Azimuth
The horizontal orbit angle, in degrees, about the target.
- Elevation
The vertical orbit angle, in degrees, about the target.
The distance is preserved when the angles are changed, so the camera swings around the product at a fixed radius.
Standard Views
A row of view buttons – Front, Back, Left, Right, Top, Bottom and 3/4 – orbits the camera to that orientation about the target in a single click, at the current distance. The 3/4 button is the standard isometric angle (azimuth -45°, elevation 30°).
Target
The Set Target buttons choose the centre of rotation:
Selected – the centre of the selected objects.
3D Cursor – the 3D Cursor location.
World Origin – the world origin.
Setting the target also re-aims the camera at it (unless the camera is locked).
Framing and Aiming
The action buttons at the foot of the panel position the camera relative to the subject:
- Frame (Selected)
Moves the camera in or out along its view so the selected objects fill the frame – the fit-to-frame. It is perspective- and orthographic-aware.
- Frame (Whole Scene)
Frames the whole scene instead of the selection.
- Look at Target
Re-aims the camera at its target without moving it.
- Level Horizon
Removes camera roll so verticals stay upright.
Resolution & Aspect
The Resolution & Aspect sub-panel stores a render resolution on each camera, so different cameras can carry different crops.
Resolution X and Y set the stored size. The aspect-ratio buttons – 1:1, 4:5, 3:2, 16:9 and 9:16 – reshape the stored resolution to a standard ratio, keeping the long edge.
The Sync Render to Camera toggle makes selecting a camera set the scene’s render output to its stored resolution. It is on by default, so selecting a camera changes the render resolution to that camera’s crop – the reason the output size can shift as cameras are switched. Turn it off to leave the render resolution alone while still storing a per-camera crop.
The Render buttons exchange the resolution with the render output directly, and work regardless of the toggle:
- Capture from Render
Stores the current render resolution onto the camera.
- Apply to Render
Pushes the camera’s stored resolution to the render output.
When a camera has no stored resolution it uses the scene resolution, and the panel says so.
Depth of Field
The Depth of Field sub-panel is enabled by the tick in its header. Focus is set either by a Focus Object the camera tracks, or, when no object is chosen, by a Focus Distance. F-Stop sets the aperture (smaller values blur the background more) and Aperture Blades shapes the out-of-focus highlights (bokeh).
Two buttons set the focus distance directly:
- Pick Focus in Viewport
Starts an eyedropper: click anything in a 3D Viewport to set the focus distance to whatever is under the cursor, and enable depth of field. Press Esc or RMB to cancel.
- Focus on Target
Sets the focus distance to the camera’s orbit target and enables depth of field.
Two-Point Perspective
Two-Point Perspective, in the Camera Settings panel, keeps vertical edges vertical – the classic look for architectural and packaging shots. It levels the camera so its view is horizontal, then solves the vertical lens shift exactly so the target stays centred in the frame, under any sensor fit or aspect ratio. Reset Shift undoes it by returning the lens shift to zero.
Framing & Guides
The Framing & Guides sub-panel controls the camera’s composition overlays. Passepartout dims the area outside the camera frame. The Thirds, Center and Golden Ratio options overlay the matching composition guides inside the frame.
Presets & Turntable
The Presets & Turntable sub-panel places the active camera at a ready-made product angle in one click, using the same preset engine as the render manager. Six preset buttons are offered:
- Hero 3/4
The classic three-quarter hero angle.
- Front
A straight-on front view.
- Side
A profile / side view.
- Top (Ortho)
An orthographic top-down view.
- Detail Macro
A tight detail shot with a longer lens.
- Rear 3/4
A three-quarter angle from behind.
Each button auto-frames the model at that angle.
Below the presets:
- Turntable
Sets up a 360° turntable: it reparents the active camera to a VIZid Turntable pivot and animates the pivot’s spin over the scene frame range. A dialog first asks for the number of Turns (1–10), the Frames / Turn (120 by default) and a Clockwise direction. The turntable is captured by adding an Animation-mode render job – it is the spin over the frame range that is rendered, not a still.
- Designer Workspace
Creates a VIZid Designer workspace – a large 3D view alongside the VIZid Gloss, Camera, VIZid Lumi Studio and Render editors – and switches to it (the first time; afterwards it just switches to the existing workspace).
Flythrough (Tween)
The Flythrough (Tween) sub-panel builds an animated camera move between two cameras – useful for review videos that need more than a hard cut. Pick a destination in To Camera, set the number of Frames, and choose Ease for a smooth ease in and out (off gives a linear move).
Create Flythrough then creates a new VIZid Flythrough camera that glides from the active camera to the destination over the chosen span, matching their lenses along the way. The move is keyframed from the current frame forward over Frames, and the scene’s frame range is extended to cover it.